Hello, I'm using QVR Pro surveillance system on QNAP system, conected to 4 YooSee cameras and 2 others, all ONVIF compatiles and all working fom at least one year.
Recently I had to replace one YooSee bought in Amazon, the new one is working with CMS and YooSee Android app, but I can't successfully configure it in QVR Pro.
The other YooSee cameras are older (ID's 11724552, 14104405, 14103900) and are configured in QVR Pro as Generic Model, Generic RTSP, multicast port 5000, RTSP port 554, URL "/onvif1". The same settings are not working for the new one (ID 20220276, fw 25.0.0.56).
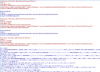
Using ONVIF Device Manager all cameras are OK, but I can see a difference in the profiles:
multicast port in old models is defined as 5000, while in the new is 554, see attached imges
It seems that this is an error because port 554 is for RTSP, not multicast.
There is a solution or I should find another model ?
Thanks
Recently I had to replace one YooSee bought in Amazon, the new one is working with CMS and YooSee Android app, but I can't successfully configure it in QVR Pro.
The other YooSee cameras are older (ID's 11724552, 14104405, 14103900) and are configured in QVR Pro as Generic Model, Generic RTSP, multicast port 5000, RTSP port 554, URL "/onvif1". The same settings are not working for the new one (ID 20220276, fw 25.0.0.56).
Using ONVIF Device Manager all cameras are OK, but I can see a difference in the profiles:
multicast port in old models is defined as 5000, while in the new is 554, see attached imges
It seems that this is an error because port 554 is for RTSP, not multicast.
There is a solution or I should find another model ?
Thanks